.png)
If you’re tired of staring at blank space in your apartment, channel your inner Tintoretto and paint on a big scale.
Bare walls are depressing. Acquiring art can be a chore. Installing wallpaper is expensive. But with a laser-focused vision, a dash of craftiness, and some determination, you (or an artist you trust and like) can turn the naked walls in your home into lovely murals.
Leaving impressionistic images on interior surfaces is, of course, a time-honored tradition. Cave paintings tell us about how people lived in prehistoric times. Illustrations on the walls of Egyptian tombs honor those who had passed. Some murals even inspire sheer awe, like those painted on cathedral ceilings.
Murals also tell us stories about the people who painted them and why—and ahead, four DIY mural artists, all with a different approach to their wall paintings, do exactly that. We spoke with them on transforming walls into art canvases, and how you too can pull off your own mural.
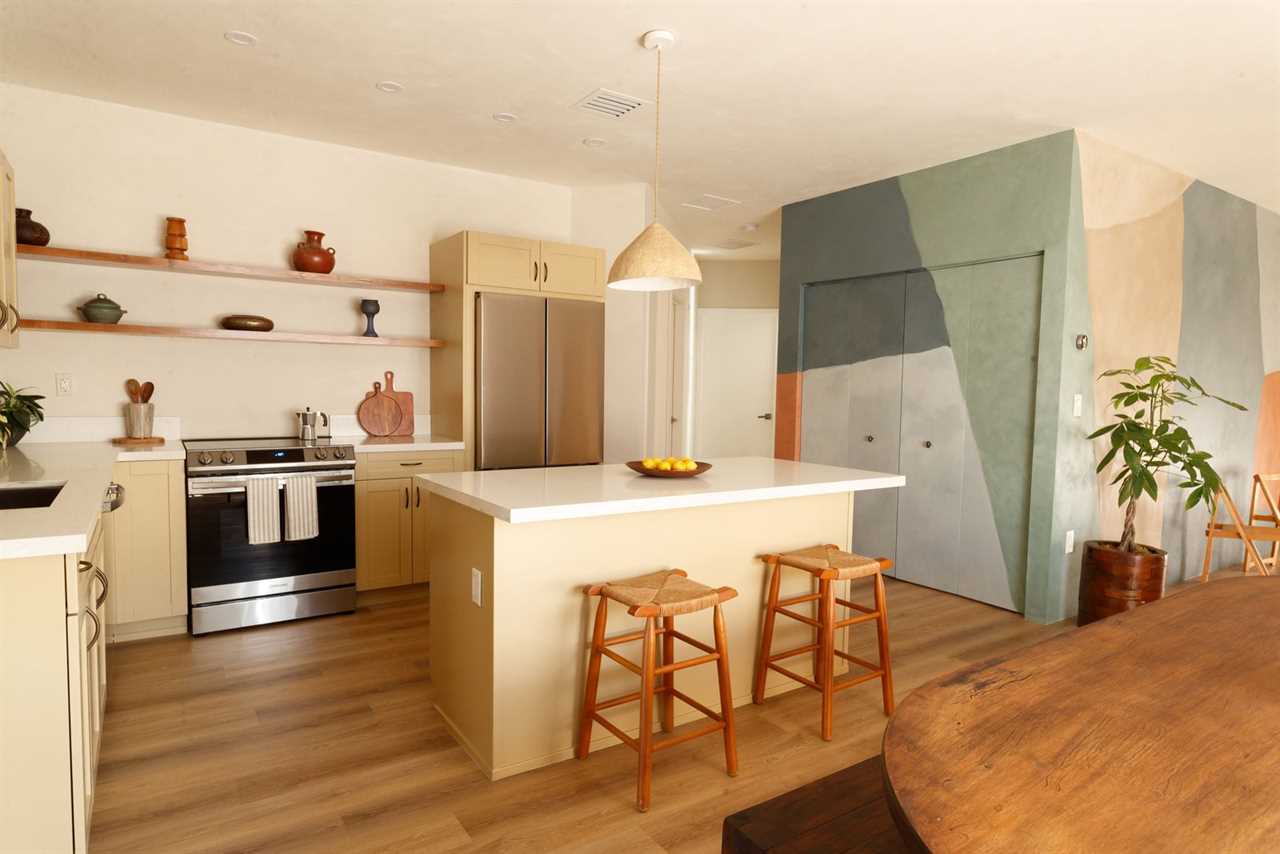
Go bold and blocky
When Luiza Solano and her partner bought Roya, the Miami-property-turned-Airbnb, a few years ago, she knew just what the sun-drenched, open-format kitchen/living room needed: a mural for the closet that hid the washer and dryer. "We were on a budget and getting an artist would have cost a pretty penny, so I searched for a design that was approachable, which was color blocks," she says.
First, she looked at a bunch of color references. Pug Seal, a boutique hotel in Oaxaca, Mexico, with murals, was an early inspiration. Next, Solano drew lines directly on the wall with a pencil, erasing and retracing until she got it right. "It’s totally a feeling. I don’t always know what I want, but I know when I see it and when it feels balanced," she says. Since the plan was for a wraparound mural, she took a wide-angle photo and placed it into an image-editing app to mock up the wall to figure out how to lay out the palette.
Solano eventually landed on nine complementary colors, three of which were the same shade of blue but with different amounts of white paint mixed in, which helped the color blocks stay tonally consistent. She had never painted a mural before, so she recalls "trusting the process," even during moments where she doubted herself. (It all worked out in the end.)
Finally, to achieve what she calls a "faux limewash effect," Solano layered on an off-white, matte-finish paint from Behr in Shoelace over the entire mural. "I feel like color blocking was an easy way to have high design without it being too difficult to achieve," she says.
Interior designer Clare Sullivan used stencil templates for the wall murals at her Connecticut house.
Photo by Nikki Hirst
Stencil and stamp it
Clare Sullivan, an interior designer and home-improvement content creator, took a more patterned approach—instead of painting an entire wall, she stamped and dabbed murals all over her Cape Cod-style house in Connecticut. "I always stencil because I’m looking for a wallpaper effect, but I could do it myself and spend fifty dollars max versus thousands of dollars," she says. "It’s a lot of work, but it’s also a lot of work to wallpaper a room."
You can find stencil templates—acetate sheets with decorative cutouts—online; Sullivan has ordered templates from Amazon and Etsy in the past. "Buy multiples," she suggests, "because it speeds up the process. I like to put one up, paint it, and work on another template while I wait for the other one to dry." You can also make your own template by finding an image online, placing a plastic sheet on the screen (a desktop screen works best), tracing the image with a Sharpie, and then using an X-Acto knife to cut out the design.
As for selecting her palette, "I’ll usually pick one [main] color—in the case of this guest room, it was a cherry red, and then I picked a complementary color to that, which was a pink, and then I went with two little accent shades, which was a blue and a green," she says of her process. Before she started stenciling, she had repainted the room white.
Since she was going for a symmetrical, wallpaper-like format, Sullivan had to measure carefully. "Square stencils are easy to lay out, but there’s a staggered quality to wallpaper that I like to think about," she says. In order to achieve this effect, she actually mapped out two separate grids.
As for tools and supplies, she recommends a bowl of water, cheap kitchen sponges that are cut into one-inch pieces, the original wall color (to touch up any mistakes with a small brush), and Scotch Spray Mount Adhesive—not painter’s tape, which Sullivan says can get crusty and messy. Spray adhesive is sticky but non-goopy, and easy to peel off without damaging walls.
When you’re ready to start painting, Sullivan says to dab with a delicate hand. "If you start smooshing, it’ll bleed, and that’s the biggest issue you might encounter," she says. "You never want to brushstroke—otherwise, you’ll go through the lines and the bristles might go underneath the template." For the "weird little nooks and crannies" that don’t fit an entire stencil, she recommends tackling those areas last and cutting the stencil templates to make them fit.
"I think people can get intimidated by DIY, but it’s really rewarding to create something with your hands," she says. "And it saves you a lot of money, too."
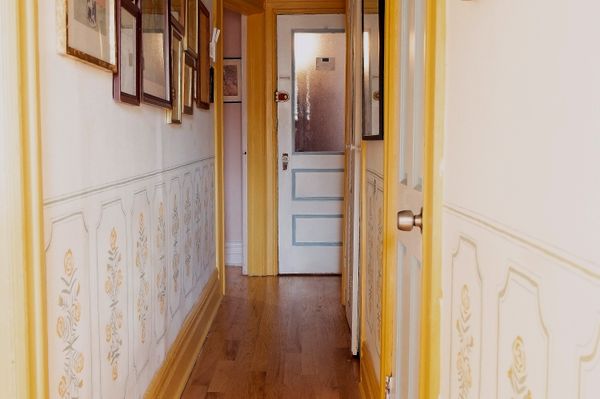
The low mural in interior designer Sydney Moss’s Brooklyn hallway helps split up the narrow space.
Photo by Kyu Nakama
Split it in half
Brooklyn-based interior designer Sydney Moss previously lived in an apartment where the front door opens to a long and narrow hallway. "It’s the first thing you see when you walk into the apartment so I wanted it to have an impact," she says.
She painted a low mural that essentially functions as a trompe l’oeil chair rail, which she says "was a nice way to split a narrow space in half." (The bonus is that you can sit while you paint.) "I was gardening a lot and became obsessed with marigolds, which is why I painted them," she adds. Sydney loved the idea of repeatable block prints, but still wanted each flower to be individual so she drew each one freehand with a pencil then painted them, using leftover sample paints from previous projects.
She used Behr’s Dynasty paint line—it doubles as a one-coat primer, is fast-drying, and doesn’t scuff—which is especially ideal for rentals like hers where the walls might not be finished. "I wish I had added a coat of white first, and then painted over it, but it was too late," she says. "I’m kind of learning as I go. What I want to do [moving forward] is add a nice base coat color first, and then go in."
Undertaking such a personal project in a rental is a bittersweet experience, so it’s helpful to approach it with a Zen mindset. "I just accept that it’s going to get covered up one day, but that I got to do it while I was here," Moss says. Case in point: Last month, she and her partner had to move unexpectedly but she has since viewed this relocation as an opportunity to start another mural project. This time, she’s painting a floor-to-ceiling mural of trees in a windowless room that’s used as her office.
"When I was taking continuing ed classes at Pratt, my professors talked about how psychologically you respond to images of nature the same way you would respond to real plants and feel a sense of calm that’s good for anxiety," Moss says. "To have images of nature in the home is joyful. I want to cover my world with flowers."
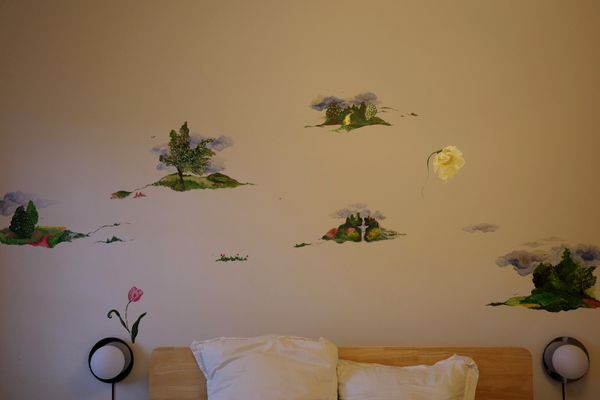
Brooklyn artist Laura Chautin’s whimsical mural vignettes help frame her bed.
Photo by Laura Chautin
See the full story on Dwell.com: 4 DIY Muralists on How They Turned Bare Walls Into an Artistic Moment
Read More
By: Jinnie Lee
Title: 4 DIY Muralists on How They Turned Bare Walls Into an Artistic Moment
Sourced From: www.dwell.com/article/4-diy-muralists-on-how-they-turned-bare-walls-into-an-artistic-moment-02b6e725
Published Date: Tue, 30 Sep 2025 13:02:18 GMT