Macworld
An Apple ID can be the key that unlocks your cloud treasure-but if it’s in the wrong hands, it can allow an interloper to destroy memories and contacts, access your financial information through password resets, impersonate you to friends in scams, and even track you without your permission.
Apple continues to look for additional ways to protect your online life and devices by “hardening” how you log into an Apple ID from your devices and through the iCloud.com and Apple ID websites, among other places. The latest improvement came in January 2023 and requires a minimum of iOS 16.3, iPadOS 16.3, and macOS 13.2 on your devices.
This update allows you to use hardware security keys that plug in via USB or Lightning or connect via NFC as a “second factor”-something in addition to a password that proves you are the legitimate account holder.
Designed around a broadly supported industry protocol called FIDO (after the name of the trade group that developed it), a security key has a chip inside that can generate a set of encryption keys for each site at which you enroll with the security key. They can’t be spoofed, intercepted, or duplicated. You need physical possession of a key to use it.
Several companies offer these keys. The firm Yubico pioneered them and has the largest variety, including one that has USB-C and Lightning plugs on opposite ends. They cost about $20 to $60 each. Apple requires two for Apple ID enrollment. Some companies give these away as a promotion to improve account security. You don’t need two from the same maker, either.
Why you should use a security key
The cost of two keys, the need to keep them safe, and the requirement of having one whenever you need to log into your Apple ID could be too much for many people. Apple’s existing code-based two-factor authentication (2FA) system might work well enough for you, and it only requires possession of a trusted device associated with your Apple ID account or a phone number that you’ve validated to be trusted to receive text messages or automated voice calls.
However, hardware security keys are being used for more and more websites as a method of strong account protection, and if you start using them, you might find it more convenient than other methods of logging in. Among other benefits? You can use the same hardware key on multiple devices and platforms, so you aren’t tying the login to, say, the iCloud Keychain syncing system.
If you’re interested in shifting to hardware encryption keys for Apple ID logins, first purchase two of the above and then read on.
Yubico
An important note: Apple doesn’t make it crystal clear in their document About Security Keys for Apple ID that security keys replace the company sending you six-digit codes via trusted devices or trusted phone numbers. Apple notes, “A security key can act as the second piece of information, instead of the six-digit verification code that is normally used.” However, in testing, with security keys enabled, the code-based method cannot be used. Disabling security keys reverts to codes.
How it works behind the scenes: a pair of keys
The security keys use public-key cryptography, something you might have heard about before. All the complexity is hidden from you as a user-one of the intents of the FIDO Alliance. In public-key cryptography, whenever you need a new identity-such as a key used for proving your ownership of an account at a website-an operating system or other software randomly generates a strong secret and derives a public key and a private key from them, which are intertwined mathematically.
The private key is kept strictly secret by your software or hardware. Typically, it never leaves your device and may not even be directly accessible by you, its owner. The public key, however, can be freely shared. Other parties who possess your public key can use it both to encrypt messages that only you can read, decrypting them with your private key; and to verify that a document or other message you send them is valid. Your device can cryptographically “sign” a message with the private key, and anyone with the public key can be assured that it was signed only by you.
With a hardware security key and the FIDO protocols, you enrolled at a website by signing up via your account settings to use two-factor authentication with a hardware key. Your hardware key creates the unique secret for the site and transmits the public key to the site, which stores it with your account information.
When logging in later, here’s what happens:
- The site issues a challenge using the public key that it previously stored for you.
- Your operating system communicates with the security key to have it generate a response, signing the challenge with the private key for that website. (If the public key the website provided doesn’t match, it indicates a possible phishing attempt, and the process fails.)
- Your operating system sends back the signed challenge.
- The website uses the stored public key to validate it’s you. If so, you’re logged in.
While this might all sound fussy, you aren’t involved in any of the particulars. Instead, to use a security key, you insert it when prompted into a USB Type-A, USB-C, or Lightning jack and press, touch, or tap it. (You can leave it inserted and trigger it whenever prompted by your device or a website.) With a touchless NFC security key, you bring it near a device that supports NFC. The security key then generates the appropriate information at the time of enrollment or when you log back in later.
Enroll your Apple ID with security keys
You can enroll in security key authentication for your Apple ID via either iOS 16.3/iPadOS 16.3 or later or macOS 13.2 or later. You can’t enroll at iCloud.com or the Apple ID website.
Apple requires you to have at least two security keys in case one is lost. You will want to store them in different locations that you have access to.
In any situation in the past in which you were prompted to enter a code for authentication, you will now need to have one of your security keys handy. Apple explicitly notes that’s always the case for all of the following tasks:
- Add a new device.
- Log in to an Apple website with your Apple ID.
- Reset your Apple ID.
- Unlock a locked Apple ID account.
- Add or remove security keys (but not remove security key authentication completely).
Warning! If you lose both keys-or they’re stolen, broken, or destroyed-you can still rely on trusted devices to regain account access or remove keys and enroll new ones. However, if you can’t use your security keys and lose access to all trusted devices, your Apple ID account will likely be unavailable forever.
After enabling security keys, you must use an iPhone or iPad whenever you need to sign in to a new Watch, Apple TV, or HomePod (any model). You can’t use a Mac for that purpose.
How to set up a security key with your Apple ID (macOS)
Here’s how to set up security keys for your Apple ID in macOS:
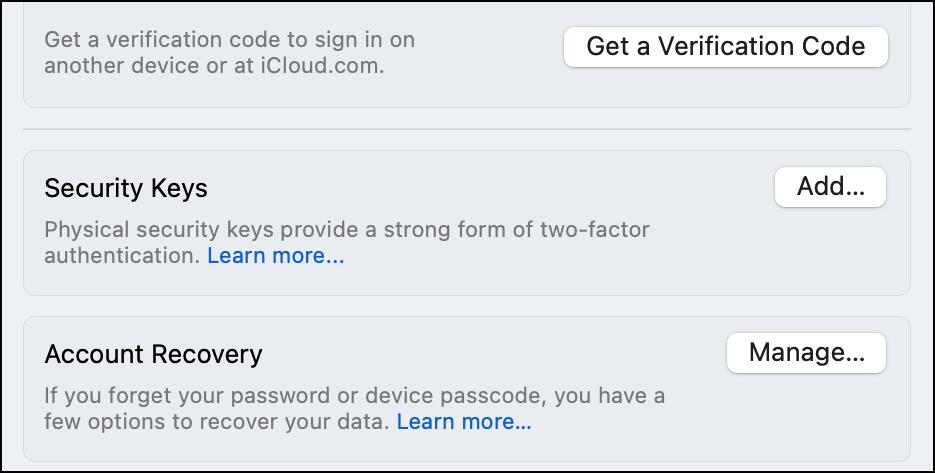
- Go to > System Settings > Account Name > Password & Security and click Add to the right of the Security Keys label.
- Apple presents an overview of how security keys affect your account. Click Add Security Keys to continue.
- Apple warns you two keys are required; click Continue.
- Even though the dialog says Apple ID and “Apple ID wants to make changes,” enter your macOS account’s password and click Allow.
- To add each security key, you’re presenting with an Add the First Security Key or Second Security Key screen. Follow these steps for both passes:
- Click Continue.
- When prompted to Add Security Keys, insert the key if it has a plug and then activate it: press a button, hold it a certain way, or tap it.
- Name the key uniquely-perhaps write a number on it in indelible marker-and click Continue. By default, Apple fills in the key’s model name.

- After enrolling both keys, Apple provides a list of devices currently signed into your iCloud account. You can select those to log out at this step, click Stay Signed In to All, or even click Cancel to end the process without enrollment.
- At the acknowledgment screen, click Done.
Apple sends an email to your Apple ID-associated address to confirm enrollment (or alert you of that fact).
How to set up a security key with your Apple ID (iOS/iPadOS)
The process is nearly identical to using macOS. Two differences:
- Start at Settings > Account Name > Password & Security and tap Add Security Keys.
- When you’re prompted to add a key in step 5->1 above, you can also bring an NFC-equipped security key near the top of your iPhone or iPad and it will be recognized and activated.
How to remove security keys or disable them altogether
Apple doesn’t require a security key to be present to remove it or disable security key authentication. Go to Settings (iOS/iPadOS)/System Settings (macOS) > Account Name > Password & Security. Tap Security Keys or click Edit next to the Security Keys label. (This is a security risk: someone with access to your iPhone or iPad passcode can disable hardware security key authentication and then use code-based two-factor verification as discussed in this Wall Street Journal article about thefts and physical attacks.)

You can remove a single key only if you have three or more enrolled.
In iOS/iPadOS:
- Tap an entry, and you can rename it, or tap Remove Key and confirm to remove it. You’ll need a security key to finish.
- Tap Remove All Keys and confirm by tapping Remove to disable authentication. Then enter your iPhone or iPad passcode.
- Tap Add Security Key to enroll additional keys. Apple prompts you for one of your existing security keys to finish.
In macOS:
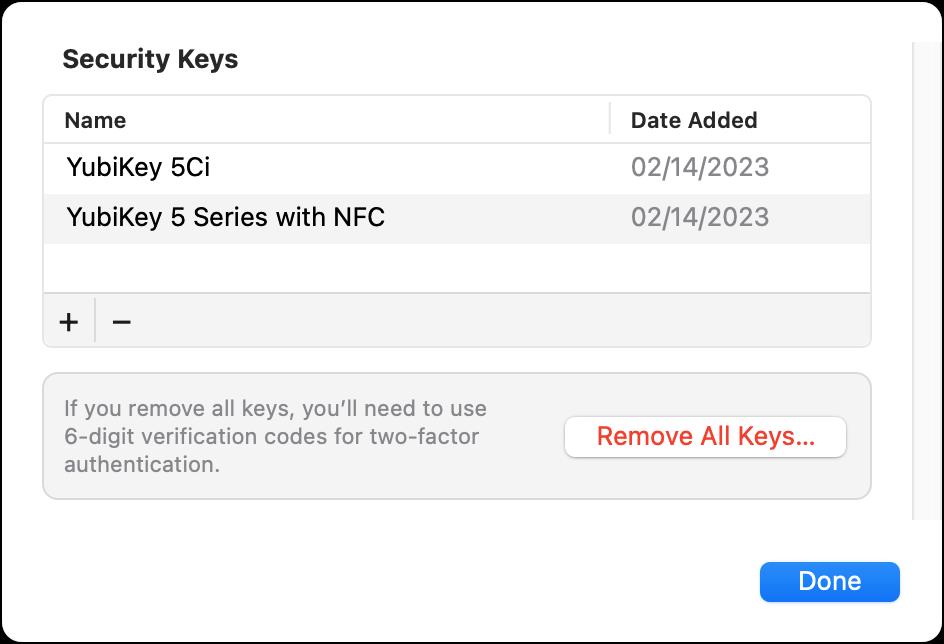
- Click an entry’s name to change the name.
- Select an entry and click the minus (-) icon to remove it and confirm its removal, then provide the security key.
- Click Remove All Keys and enter your macOS account password.
- Click the plus (+) icon to enroll additional keys. Apple prompts you for an already-enrolled security key to finish.
In both cases, code-based 2FA is now re-enabled.
Read More
Title: How to set up hardware security keys with your Apple ID
Sourced From: www.macworld.com/article/1666866/hardware-security-keys-apple-id.html
Published Date: Mon, 03 Apr 2023 09:00:00 +0000
Did you miss our previous article...
https://trendinginbusiness.business/technology/italy-bans-chatgpt-over-privacy-laws-and-im-not-surprised
.png)


